안드로이드 스튜디오(나이분류, 두 수 더하기, 이미지버튼)
새로운 레이아웃을 만들고 새로운 동작이되도록 하려면Java -> Acitivity파일을 만들어야 한다.
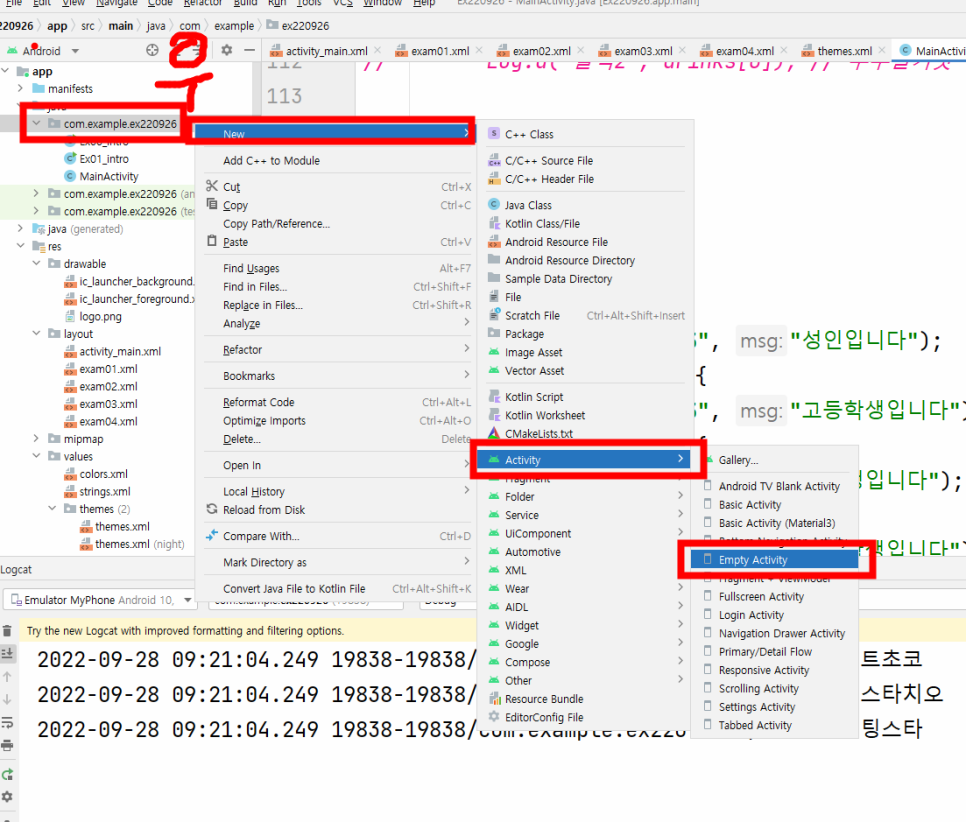
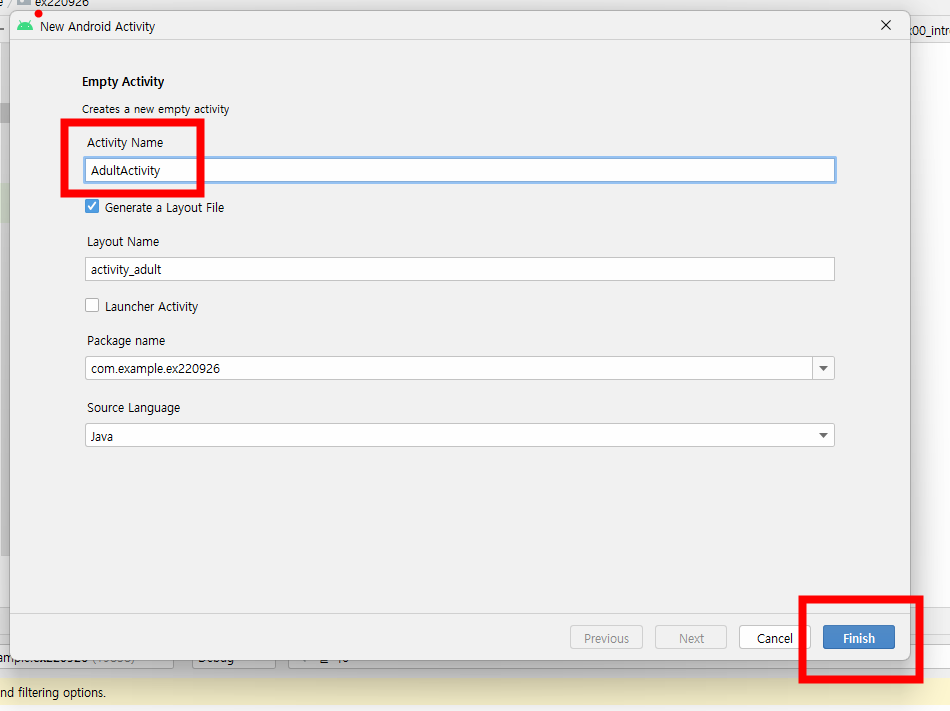
이름을 설정해주면 자동으로 레이아웃 파일의 이름이 activity 파일에 따라 정해진다.
· Activity를 새로 만들었다면 반드시 확인해야 할 부분
1) 첫 시작 화면을 어떤 화면으로 설정할건지 좌측 manifests폴더 안에 AndroidManifest.xml에서 수정!!
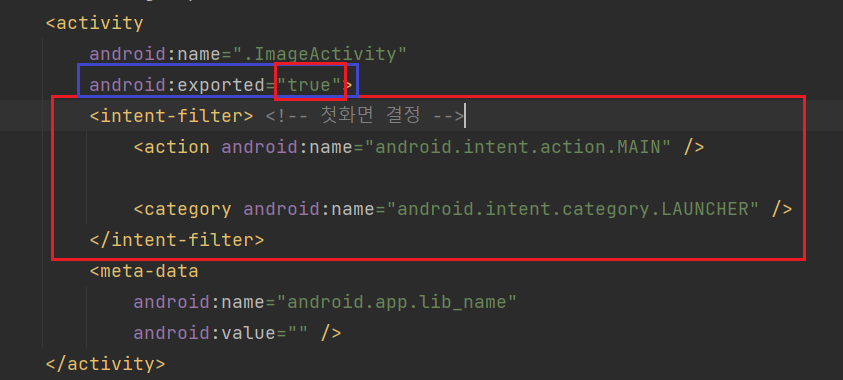
2) 빨간부분을 위와 같이 바꾸어 주어야 한다.
<activity /> 안에 <intent-filter> 를 넣어주고 android:exported = "false"->"true" 로 바꾸어주어야 한다.
1. 나이 분류하기
- activity_adult의 layout 소스코드
<?xml version="1.0" encoding="utf-8"?>
<androidx.constraintlayout.widget.ConstraintLayout xmlns:android="http://schemas.android.com/apk/res/android"
xmlns:app="http://schemas.android.com/apk/res-auto"
xmlns:tools="http://schemas.android.com/tools"
android:layout_width="match_parent"
android:layout_height="match_parent"
tools:context=".AdultActivity">
<TextView
android:id="@+id/tvResult"
android:layout_width="wrap_content"
android:layout_height="wrap_content"
android:layout_marginTop="120dp"
android:text="나이를 입력해주세요"
android:textSize="32sp"
app:layout_constraintEnd_toEndOf="parent"
app:layout_constraintStart_toStartOf="parent"
app:layout_constraintTop_toTopOf="parent" />
<EditText
android:id="@+id/etInput"
android:layout_width="100dp"
android:layout_height="100dp"
android:layout_marginTop="64dp"
android:ems="10"
android:inputType="textPersonName"
android:textAlignment="center"
android:textSize="48sp"
app:layout_constraintEnd_toEndOf="@+id/tvResult"
app:layout_constraintStart_toStartOf="@+id/tvResult"
app:layout_constraintTop_toBottomOf="@+id/tvResult" />
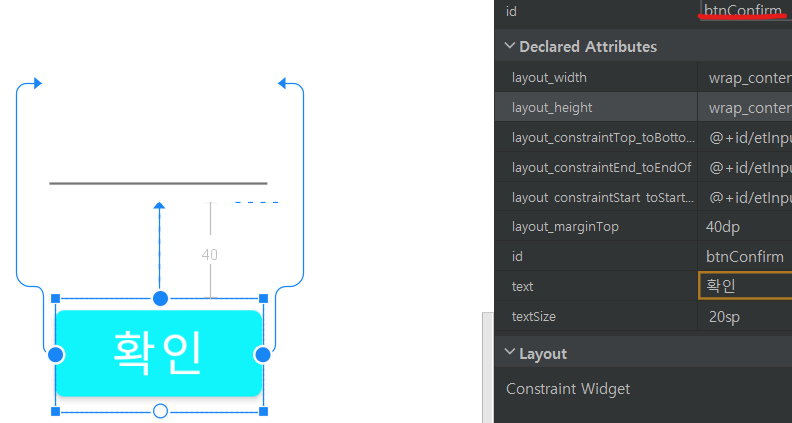
<Button
android:id="@+id/btnConfirm"
android:layout_width="wrap_content"
android:layout_height="wrap_content"
android:layout_marginTop="40dp"
android:text="확인"
android:textSize="20sp"
app:layout_constraintEnd_toEndOf="@+id/etInput"
app:layout_constraintStart_toStartOf="@+id/etInput"
app:layout_constraintTop_toBottomOf="@+id/etInput" />
</androidx.constraintlayout.widget.ConstraintLayout>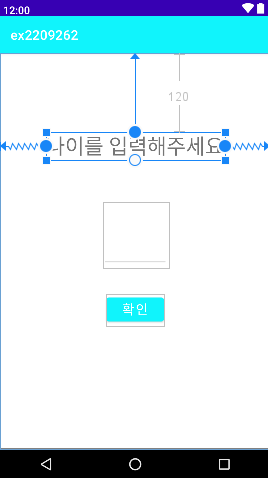
text -> Plain Text를 넣으면 입력을 받을수 있는 창을 만들 수 있다.
layout_constraint 옵션을 이용하여 각 텍스트상자와 버튼을 중앙 정렬 및 사이 값을 고정 시킨다.
이렇게 하면 layout은 어느 정도 완성이 된다.
그럼 만들었던 PlusActivity파일로 돌아가서
@Override
    protected void onCreate(Bundle savedInstanceState) {
        super.onCreate(savedInstanceState);
        setContentView(R.layout.activity_plus);
이 부분뒤에 내가 실행하려는 함수들을 입력하면 된다.
※ 각 부분들을 좀 더 직관적으로 내가 나중에 다시 보면 이해될 수 있고, 다른 사람들이 코드를 읽었을 때 이해 될 수 있도록 각 버튼이나, 텍스트 상자들에 ID를 설정 해주는 작업(Camel 표기법을 추천)이 필요하다.
- id 지정 - 나이 입력창 ID : etInput , 확인 버튼창 ID : btnConfrim, 결과창: tvResult

- AdultActivity 소스코드
package com.example.ex2209262;

import androidx.appcompat.app.AppCompatActivity;

import android.os.Bundle;
import android.view.View;
import android.widget.Button;
import android.widget.EditText;
import android.widget.TextView;

public class AdultActivity extends AppCompatActivity {

    @Override
    protected void onCreate(Bundle savedInstanceState) {
        super.onCreate(savedInstanceState);
        setContentView(R.layout.activity_adult);xzu
        // 0. 사용할 모든 View를 초기화
        // 초기화 방법
        TextView tvResult =(TextView) findViewById(R.id.tvResult);
        EditText etInput = findViewById((R.id.etInput));
        Button btnConfirm = findViewById(R.id.btnConfirm);
        // tvResult.setText("오늘의 점심은??");

        // 여러가지 행동들이 일으키는 사건: Event
        // Event를 감지하는 객체: Listener

        // 1. btnConfirm을 눌렀을때,
        // 1-1. 버튼 클릭을 감지하는 리스너를 설치!!
        btnConfirm.setOnClickListener(new View.OnClickListener() {
            @Override
            public void onClick(View view) {
                // 2. etInput의 값을 가져온 후
                String input = etInput.getText().toString();
                // String to Int 변환: Integer.parseInt(문자열)
                int age = Integer.parseInt(input);
                // 3. 20이상이면 tvResult를 "성인입니다"로 수정
                // 20 미만이면 tvReslult를 "마성년자입니다"로 수정
                if(age >= 20){
                    tvResult.setText("성인입니다");
                }
                else{
                    tvResult.setText("미성년자입니다");
                }
            }
        });
    }
}
0. 사용할 모든 View를 초기화
TextView tvResult =(TextView) findViewById(R.id.tvResult);
EditText etInput = findViewById((R.id.etInput));
Button btnConfirm = findViewById(R.id.btnConfirm);
1. btnConfirm을 눌렀을때,
1-1. 버튼 클릭을 감지하는 리스너를 설치
btnConfirm.setOnClickListener(new View.OnClickListener()
2. etInput의 값을 가져온 후
3. - 20이상이면 tvResult를 "성인입니다"로 수정
- 20 미만이면 tvReslult를 "마성년자입니다"로 수정
- 모든 ID(만든 변수)들을 초기화 시켜주어야한다.
→ (findViewById(R.id.변수명): R의 영역에 id(이름)를 저장.)
- TextView tvResult =(TextView) findViewById(R.id.tvResult);
- EditText etInput = findViewById((R.id.etInput));
- Button btnConfirm = findViewById(R.id.btnConfirm);
- btnConfirm.setOnClickListener(new View.OnClickListener() {
@Override
public void onClick(View view) {
(버튼 눌렀을 때 명령)
}
: btnConfirm 버튼을 눌렀을 때 동작하는 명령을 입력하는 함수이다.
- etInput.getText().toString();
: etInput에 받은 텍스트를 문자열로 저장한다.
- Integer.parseInt(input);
: input값(string)을 정수형(int)으로 변환
- tvResult.setText("출력할 내용");
: tvResult에 출력할 내용을 출력한다.
- .setText(""); - 빈칸으로 만든다.
- .setHint(); - setText("")와 같이 쓰면 커서뒤에 보이는 형태로 보인다.
2. 두 수 더하기
- activity_plus의 layout 소스코드
<?xml version="1.0" encoding="utf-8"?>
<androidx.constraintlayout.widget.ConstraintLayout xmlns:android="http://schemas.android.com/apk/res/android"
    xmlns:app="http://schemas.android.com/apk/res-auto"
    xmlns:tools="http://schemas.android.com/tools"
    android:layout_width="match_parent"
    android:layout_height="match_parent"
    tools:context=".PlusActivity">

    <TextView
        android:id="@+id/textView13"
        android:layout_width="wrap_content"
        android:layout_height="wrap_content"
        android:layout_marginTop="64dp"
        android:text="더하기 계산기"
        android:textSize="48sp"
        app:layout_constraintEnd_toEndOf="parent"
        app:layout_constraintStart_toStartOf="parent"
        app:layout_constraintTop_toTopOf="parent" />

    <EditText
        android:id="@+id/etNum1"
        android:layout_width="100dp"
        android:layout_height="100dp"
        android:layout_marginStart="80dp"
        android:layout_marginTop="32dp"
        android:ems="10"
        android:inputType="textPersonName"
        android:textAlignment="center"
        android:textSize="32sp"
        app:layout_constraintStart_toStartOf="parent"
        app:layout_constraintTop_toBottomOf="@+id/textView13" />

    <EditText
        android:id="@+id/etNum2"
        android:layout_width="100dp"
        android:layout_height="100dp"
        android:layout_marginTop="32dp"
        android:layout_marginEnd="80dp"
        android:ems="10"
        android:inputType="textPersonName"
        android:textAlignment="center"
        android:textSize="32sp"
        app:layout_constraintEnd_toEndOf="parent"
        app:layout_constraintTop_toBottomOf="@+id/textView13" />

    <TextView
        android:id="@+id/textView14"
        android:layout_width="wrap_content"
        android:layout_height="wrap_content"
        android:layout_marginTop="32dp"
        android:text="+"
        android:textSize="64sp"
        app:layout_constraintEnd_toStartOf="@+id/etNum2"
        app:layout_constraintStart_toEndOf="@+id/etNum1"
        app:layout_constraintTop_toBottomOf="@+id/textView13" />

    <TextView
        android:id="@+id/tvPlus"
        android:layout_width="wrap_content"
        android:layout_height="wrap_content"
        android:layout_marginTop="80dp"
        android:text="결과"
        android:textSize="64sp"
        app:layout_constraintEnd_toEndOf="@+id/etNum2"
        app:layout_constraintStart_toStartOf="@+id/etNum1"
        app:layout_constraintTop_toBottomOf="@+id/etNum1" />

    <Button
        android:id="@+id/btnPlus"
        android:layout_width="wrap_content"
        android:layout_height="wrap_content"
        android:layout_marginTop="32dp"
        android:text="더하기"
        android:textSize="24sp"
        app:layout_constraintEnd_toEndOf="@+id/etNum2"
        app:layout_constraintStart_toStartOf="@+id/etNum1"
        app:layout_constraintTop_toBottomOf="@+id/textView14" />
</androidx.constraintlayout.widget.ConstraintLayout>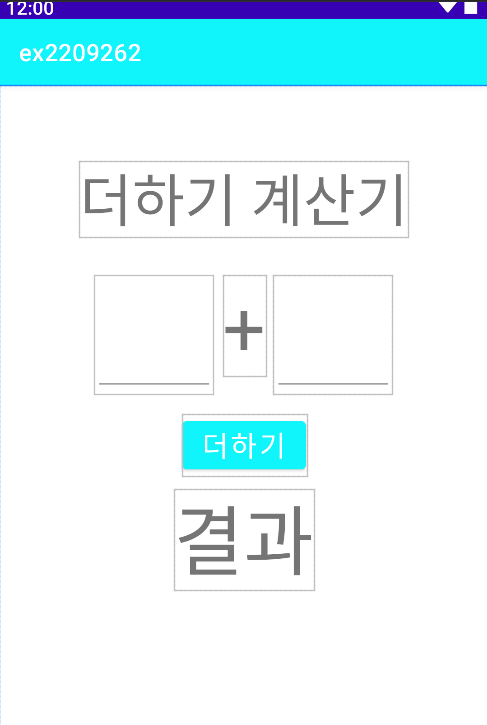
- id지정- 입력 상자 1,2 : etNum1, etNum2
- 결과 텍스트 상자: tvPlus
- 더하기 버튼: btnPlus
- PlusActivity 소스코드
package com.example.ex2209262;

import androidx.appcompat.app.AppCompatActivity;

import android.os.Bundle;
import android.view.View;
import android.widget.Button;
import android.widget.EditText;
import android.widget.TextView;

public class PlusActivity extends AppCompatActivity {

    @Override
    protected void onCreate(Bundle savedInstanceState) {
        super.onCreate(savedInstanceState);
        setContentView(R.layout.activity_plus);

        // 0. 각 View들 초기화
        EditText etNum1 = findViewById(R.id.etNum1);
        EditText etNum2 = findViewById(R.id.etNum2);
        Button btnPlus = findViewById(R.id.btnPlus);
        TextView tvPlus = findViewById(R.id.tvPlus);

        // 1. btnPlus를 눌렀을 때,
        btnPlus.setOnClickListener(new View.OnClickListener() {
            @Override
            public void onClick(View view) {

                // 2. etNum1과 etNum2의 값을 가져와서 (이 때의 값은 문자열)
                String input1 = etNum1.getText().toString();
                String input2 = etNum2.getText().toString();

                // 3. 문자열을 정수로 변환시킨 후
                int num1 = Integer.parseInt(input1);
                int num2 = Integer.parseInt(input2);

                // 4. 두 값을 더한 결과를 tvPlus에 설정
                String result = String.valueOf(num1+num2);
                tvPlus.setText(result);
                etNum1.setText(""); // UI/UX part
                etNum2.setText("");
                etNum1.setHint(input1);
                etNum2.setHint(input2);
            }
        });
    }
}
0. 각 View들 초기화
- findViewById(R.id.지정해준 아이디명)
1. btnPlus를 눌렀을 때,
- btnPlus.setOnClickListener(new View)
2. etNum1과 etNum2의 값을 가져와서 (이 때의 값은 문자열)
String input1 = etNum1.getText().toString();
String input2 = etNum2.getText().toString();
3. 문자열을 정수로 변환시킨 후
int num1 = Integer.parseInt(input1);
int num2 = Integer.parseInt(input2);
4. 두 값을 더한 결과를 tvPlus에 설정
int형으로 변환 시킨 num1+num2를 result(문자열)에 저장
- String result = num1+num2
- tvPlus.setText(result)
.setText(""); - 입력시킨창을 연산 후 빈창으로 비워준다.
3. 이미지 버튼 만들기
- activity_image layout의 소스코드
<?xml version="1.0" encoding="utf-8"?>
<androidx.constraintlayout.widget.ConstraintLayout xmlns:android="http://schemas.android.com/apk/res/android"
    xmlns:app="http://schemas.android.com/apk/res-auto"
    xmlns:tools="http://schemas.android.com/tools"
    android:layout_width="match_parent"
    android:layout_height="match_parent"
    tools:context=".ImageActivity">

    <Button
        android:id="@+id/btnPre"
        android:layout_width="wrap_content"
        android:layout_height="wrap_content"
        android:layout_marginStart="64dp"
        android:layout_marginTop="32dp"
        android:text="이전"
        android:textSize="20sp"
        app:layout_constraintStart_toStartOf="parent"
        app:layout_constraintTop_toBottomOf="@+id/ivResult" />

    <ImageView
        android:id="@+id/ivResult"
        android:layout_width="0dp"
        android:layout_height="300dp"
        android:layout_marginStart="40dp"
        android:layout_marginTop="80dp"
        android:layout_marginEnd="40dp"
        app:layout_constraintEnd_toEndOf="parent"
        app:layout_constraintHorizontal_bias="1.0"
        app:layout_constraintStart_toStartOf="parent"
        app:layout_constraintTop_toTopOf="parent"
        app:srcCompat="@drawable/img1" />

    <Button
        android:id="@+id/btnNext"
        android:layout_width="wrap_content"
        android:layout_height="wrap_content"
        android:layout_marginTop="32dp"
        android:layout_marginEnd="60dp"
        android:text="다음"
        android:textSize="20sp"
        app:layout_constraintEnd_toEndOf="parent"
        app:layout_constraintTop_toBottomOf="@+id/ivResult" />

    <Button
        android:id="@+id/btnOnOff"
        android:layout_width="wrap_content"
        android:layout_height="wrap_content"
        android:layout_marginTop="32dp"
        android:text="감추기"
        android:textSize="24sp"
        app:layout_constraintEnd_toEndOf="parent"
        app:layout_constraintStart_toStartOf="parent"
        app:layout_constraintTop_toBottomOf="@+id/btnPre" />
</androidx.constraintlayout.widget.ConstraintLayout>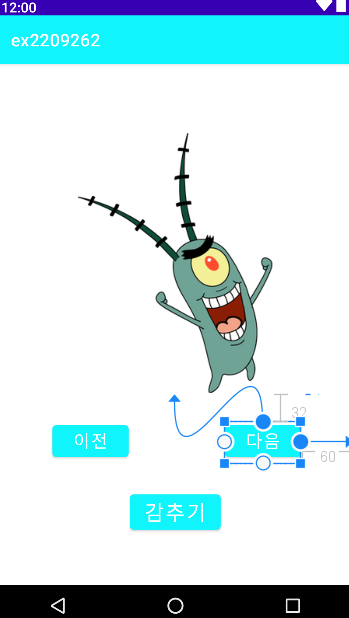
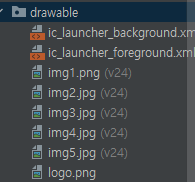
image파일 5개를 준비하고 다운받은 이미지를 img1~img5까지 저장한다.
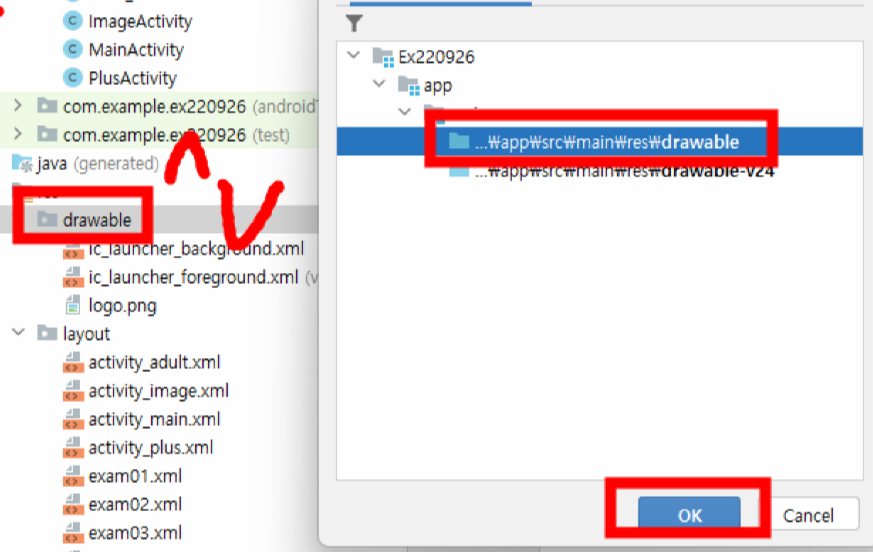
drawable 폴더에 img1 ~ img5까지 복사한다.
img1을 첫화면으로 지정한다.
- id 지정 - 이미지: ivResult
- 이전 버튼, 다음 버튼: btnPre, btnNext
- 감추기/보이기 버튼: btnOnOff
- ImageActivity 소스코드
package com.example.ex2209262;

import androidx.appcompat.app.AppCompatActivity;

import android.os.Bundle;
import android.view.View;
import android.widget.Button;
import android.widget.ImageView;

public class ImageActivity extends AppCompatActivity {

    int index; // 선언
    boolean isVisible; // 이미지 상태 변수

    @Override
    protected void onCreate(Bundle savedInstanceState) {
        super.onCreate(savedInstanceState);
        setContentView(R.layout.activity_image);

        // 0. 사용할 View를 초기화
        ImageView ivResult = findViewById(R.id.ivResult);
        Button btnPre = findViewById(R.id.btnPre);
        Button btnNext = findViewById(R.id.btnNext);
        Button btnOnOff = findViewById(R.id.btnOnOff);

        index = 0; // 초기화
        isVisible = true; // 이미지가 보이는 상태

        // lambda expression(java 1.8이상)
        btnOnOff.setOnClickListener(v -> {
            if(isVisible == true){
                ivResult.setVisibility(View.INVISIBLE);  // 보이지 않게 해주기 메소드함수, 매개변수
                btnOnOff.setText("보이기");
            }
            else{
                ivResult.setVisibility(View.VISIBLE);  // 보이지 않게 해주기 메소드함수, 매개변수
                btnOnOff.setText("감추기");
            }
            isVisible = !isVisible;
        });

        int[] imgs = {R.drawable.img1, R.drawable.img2, R.drawable.img3, R.drawable.img4, R.drawable.img5};

        // 맨 처음 이미지: img1 ->imgs[0]
        // "다음"버튼 눌렀을 때 출력되어야 하는 이미지: imgs[1]

        btnNext.setOnClickListener(new View.OnClickListener() {
            @Override
            public void onClick(View view) {
                // "다음" 버튼 눌렀을 때, 동작하는 부분
                index++;
                if(index == imgs.length){
                    index = 0;
                }
                ivResult.setImageResource(imgs[index]);
            }
        });

        btnPre.setOnClickListener(new View.OnClickListener() {
            @Override
            public void onClick(View view) {
                // "이전" 버튼 눌렀을 때, 동작하는 부분
                index--;
                if (index == -1) {
                    index = 4;
                }
                ivResult.setImageResource(imgs[index]);
            }
        });
    }
}
0. 사용할 View를 초기화
1."다음" 버튼 눌렀을 때, 동작하는 부분
2."이전" 버튼 눌렀을 때, 동작하는 부분
3. 보이지 않게 해주기 메소드함수, 매개변수
4. 보이지 않게 해주기 메소드함수, 매개변수
- 변수 선언
int index;
boolean isVisible;
- 변수 초기화
index = 0;
isVisible = true; // 이미지가 보이는 상태
- index++; // 인덱스 변수를 1씩 증가
- lambda expression(java 1.8이상)
btnOnOff.setOnClickListener(v -> {})
- .setVisibility(View.INVISIBLE); // 보이지 않게 해주기 메소드함수, 매개변수
- .setVisibility(View.VISIBLE); // 보이지 않게 해주기 메소드함수, 매개변수
- .setText("텍스트상자 내용"); // 텍스트 상자의 내용을 "" 내용으로 변경
- .setImageResource(이미지); // 이미지 출력
- isVisible = !isVisible; // true 이면 false, false 이면 true
- int[] imgs = {R.drawable.img1, R.drawable.img2, R.drawable.img3, R.drawable.img4, R.drawable.img5}; // int형의 리스트에 R영역의 drawble 폴더의 img 1~ 5까지 인덱스 0~4에 저장
맨 처음 이미지: img1 ->imgs[0]
"다음"버튼 눌렀을 때 출력되어야 하는 이미지: imgs[1]
'개발 공부 > 안드로이드 스튜디오(코틀린)' 카테고리의 다른 글
| 안드로이드 스튜디오(문자열 배열, 게시판에 게시글 추가/삭제) (0) | 2023.10.18 |
|---|---|
| 안드로이드 스튜디오(새로운 프로젝트 만들기, ViewBinding 사용법) (0) | 2023.10.18 |
| 안드로이드 스튜디오(로그인페이지/이동) (0) | 2023.10.18 |
| 안드로이드 스튜디오(시작/끝으로 이동, 홈화면/색바꾸기) (1) | 2023.10.18 |
| 안드로이드 스튜디오 사용! (1) | 2023.10.17 |


